Marking a Queen Bee
Why Marking a Queen is Not Essential
Without a queen, or without a healthy queen, the colony will be on a path to collapse. Usually the bees will intervene and take care of things on their own accord. But other times beekeeper intervention will be required. Regardless, knowing your queens is in good health and productive is critical.
But first things first.
You don’t need to find her! In fact, for many inspections you only need to verify the presence of eggs in cells. Seeing recently laid eggs is generally all the experienced beekeepers needs to be comfortable that the queen is productive – and there!
But to actually locate the queen, experienced beekeepers have some tricks up their sleeve. They will know that the queen will often be towards the center of broodnest frames. Queens also move a little differently than the other bees. Finally, nurse bees – when in the presence of a queen –will often turn to face her.
Why Mark a Queen?
That said, when you’re looking at a hive full of tens of thousands of bees, finding the queen (or even just those tiny eggs through your veil) can be overwhelming. Most beekeepers agree that marking a queen shortens the time to locate her, reduces the disturbance to the colony during inspections, and can help reduce questions about if a supercedure or swarm event has taken place.
So visually spotting the queen during the inspection can offer peace of mind and make inspections more efficient, especially for the inexperienced beekeeper. But all beekeepers experience a little joy when seeing their beautiful queen bee!
Another benefit is that if you find an unmarked queen in a hive that previously had a marked queen then you know the original queen has been replaced.
Two Ways to Get Your Queen Marked
Depending on how you obtain your bees, you may be able to simply ask your supplier to mark your queen (many suppliers will charge a reasonable and nominal fee to do so, while others will do it for free). Receiving a marked queen is very common and, if you are a new beekeeper, recommended.
But if you didn’t have that option when you obtained your bees, then you can mark the queen bee yourself. Let’s take a look at how to do that.
What You Need
- If you decide to mark your queen, you will need:
- A suitable time to inspect your hive and mark the queen
- A queen marking tube or cage to capture your queen
- A queen marking pen, of the right color
When to Mark a Queen
Once you’ve decided that you’d like to or need to mark a queen, decide on timing. It is best not to interfere with a newly hatched queen in the hive. Instead, wait until the new queen has taken her mating flights and is laying eggs.
If introducing a newly mated unmarked queen, wait until she’s accepted by the hive and things have settled into a routine.
Once the timing is right, choose a day with nice, comfortable weather to mark your queen.
How to Mark a Queen
There are three steps to the process.
- Find and capture your queen
- Mark her correctly
- Release the queen
Capturing Your Queen
To catch her you’ll first need to find her – and of course she isn’t yet marked. Carefully inspect your frames one-by-one, and locate your unmarked queen. Use minimal smoke to avoid smoking the queen into hiding. If you can’t find her on the first or second go-around, we’d suggest putting the hive back together and trying again in a week, to avoid disturbing the colony too much.
Sometimes all it takes is a fresh mindset, a more relaxed colony, or a little different light…perhaps during a different time of the day.
Once you’re able to find the queen however, you have some choices for the equipment you will need, to help you catch and secure her long enough to allow you to mark her thorax.
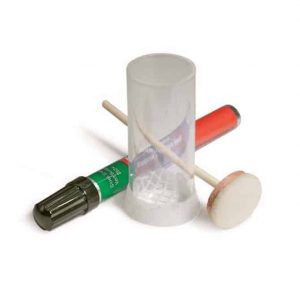
- A Queen Marking Tube retains the queen in a clear plastic tube. By gently closing a soft, foam plunger against the queen, you can keep the queen in place, allowing for the marking to be performed through a plastic screen.
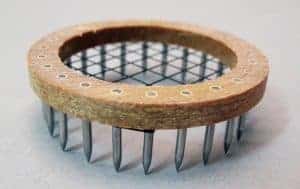
- A Queen Marker Cage can be pushed right into the comb, over the queen once she’s located. Within this temporary cage marking can then take place.
It should be noted that some experienced beekeepers mark queens without the use of a tool, by simply catching her and holding her between their fingers to perform the process. This is not advisable when wearing gloves however, and has the highest risk of injuring the queen.
Marking your Queen
To mark the queen, a non-toxic, water-based paint pen is most commonly used, with Posca being the most popular brand. But first, test the pen. Now is not the time that you want to run out of paint or have a pen that isn’t primed. Prior to this point, make sure you shake your pen and test on another surface to ensure it’s working properly.
With the pen checked, simply place a dot of the appropriate color (see below) on the thorax of the queen to mark her. Once you’ve dabbed a small, solid dot on the queen’s thorax you’re almost done.
It is very important to avoid crushing the queen during the caging process. It is also critical to avoid using too much pressure when actually marking the queen, and it’s critical to avoid getting any paint on the queen’s antenna, eyes, wings, or any other part of her body other than top center of the thorax. Any missteps here could lead to the hive potentially rejecting the queen.
Releasing the Marked Queen
Once marked, keep the queen confined for several minutes to allow the paint to dry, keeping the queen in the shade if possible to avoid any overheating type of situation. By allowing the paint to dry, we’ll ensure maximum longevity of the paint (which should last the life of the queen), and that attendant bees don’t immediately clean off the wet paint from the queen.
After allowing ample time for the paint to dry, gently release the queen back onto a brood frame (assuming you didn’t use a marker cage, in which case she remained on the frame). Carefully insert this frame back into the broodnest, taking care not to roll the queen.
When carefully and properly done, marking a queen does no harm to the queen, and the hive will carry on just as they had before.
The Queen-Marking Color System
While you could potentially mark your queens with your favorite color or one that you think stands out the best (and many beekeepers do so), the drawback here is that without very studious record keeping you won’t know the age of your marked queens. Thus, a standardized beekeeping color-coded system has been accepted, based upon the year the queen was born. That formula is as follows:
- Years Ending in 1 & 6 - White
- Years Ending in 2 & 7 - Yellow
- Years Ending in 3 & 8 - Red
- Years Ending in 4 & 9 - Green
- Years Ending in 5 & 10 - Blue
With queen bees typically living a few years at the most, there is no overlap with this system and you’ll always be able to tell what year your queen was born. This is helpful when a beekeeper needs to make decisions regarding the possible requeening of a hive, and these colors are still easily seen and stand out well enough in the hive.
If marking the queen and having a color system based on the year is not quite enough for your desired level of record keeping, some beekeepers take things one step further and also number their queens with a specific number. This process requires extra time, care, and equipment, but will allow for the best and most detailed record keeping possible.
In Conclusion
While marking your queens is by no means a required beekeeping practice, taking the time to perform this one-time extra step will allow you to quickly locate queens, determine when the colony has replaced older or failing queens, and keep track of the age of the queens in your apiary.
It just takes the right tools, a little bit of time, and a steady hand.
Please Feel free to give your inquiry in the form below.We will reply you in 24 hours.
